I got the text out of the LDS New Testament Stories, and the pictures are from "Baby's First Easter"
Friday, March 25, 2016


Wednesday, February 17, 2016
Cadette Special Agent Badge

if you are interested in files for the mystery we solved, the suspect roles they acted out, the sticky fingers activity, the fingerprint chart, the forensic document examiner activity, etc. e-mail me, I can't post it all here!
Fingerprinting Gathering Activity (requirement #1)
As they arrived we fingerprinted all the girls and made a chart showing how many fingers were loops, whorls, and arches. Compared it to the national average!
· CSI Party, play detective! (requirement
#1)
We had a crime scene and then solved the case to find out who killed Jack Duck!
Careers: Crime Scene Photographer
Photograph crime scene |
Reading Body Language, Detecting Lies requirement #4
Girls acted out all the suspects and different types of body language cues. |
Play Detective requirement #1
Girls solved a case called sticky fingers using fingerprint minutiae.
|
Forensic Lab requirement #3
Make fake-blood droplet cards and analyze the difference shapes of blood droplets based on angle and distance. (I've included pictures of the other two options if you have more time they aren't as messy!) |
Eyewitness Activity requirement #2
Girls learn about the unreliability of eyewitnesses and try their hand at drawing suspects.
|
Careers: Forensic Document Examiner requirement #5
Girls learn to look closely at handwriting and look for clusters of similarities to make an identification. Girl's use writing samples to identify who left the note found at the crime scene for clue #5.
Bonus: not forensics at all, girls learned about handwriting analysis which is like a personality test and was totally fun!! |
We had a small snack and drink between one of the activities because this was a long activity with a lot of work for the girls to do!
CSI Party:

requirement #5 Careers (optional, we did two careers, you only need to do one)
Crime Scene Photography by the Book
Supplies
Supplies
· Enough photography checklists for every camera, phone, iPad, etc you will be doing photography with.
5 minutes Give a list of of careers in forensics, explain the purpose of crime scene photography and how to do it correctly.
10 minutes Have
girls be Crime Scene Investigators! Take
pictures according to the FBI handbook. Take some fun pictures too!

 |
| Gross, we should have done murder by poison! |
Requirement #2
Reading Body Language, Detecting lies
Supplies
·
Suspect
statements
list of body language clues and what they indicate
list of body language clues and what they indicate
· optional: a hat or clothing prop for each suspect
3-5 minutes
instruction on how to read body language and detect lies (not making eye
contact, blushing, raising vocal pitch, touching face, scratching nose,
fidgeting, repeating words like honestly or truthfully, leaving out details in
a story, or changing the story when told repeatedly, blinking frequently.)
10 minutes read
suspect statements and start guessing who did it and why!
Requirement #1
Investigation Activity
Supplies
·
Minutiae
Chart
· "Sticky
Fingers Case" available from internet, pencils
3-5 minutes
instruction on the importance of minutiae in identifying fingerprints
10 minutes solve
the “sticky fingers” case answer these questions as they work through the case:
What type of
finger print pattern is each finger of the suspects?
Is this
combination of fingerprint patterns common? No, extremely rare.
Find two minutiae
on the suspect’s fingerprints.
Try to match the
crime scene fingerprints to the suspect prints.
Was the suspect
at the crime scene? Yes
Was the suspect
most likely right or left-handed? Right
Are the location
of his prints at the crime scene consistent with a customer or a thief? Thief-they are on the cash register.
Is it surprising
that the prints on the bakery display case don’t match the thief? No.


Requirement #3
Forensic Science Lab
Blood Spatter
Blood Spatter
Supplies:
·
2
packets red Crystal Light (enough to make 2 quarts)
·
2
teaspoons boiling water
·
Paper
cup
·
Straws
·
Coffee
Stirrer or Capri Sun straws
·
White
construction paper
·
Ruler
·
Measuring
tape
·
Something
to protect walls and floor like a disposable tablecloth, butcher paper,
newspaper, large cardboard box.
·
Instruction
papers, pencils
·
Optional:
aprons or paint shirts
3-5 minute
instruction on what Forensic Science is, how it helps solve crimes, and how to
do this science project.
10 minutes to
make blood spatter cards
Don't focus too much on blood aspect since these are middle school girls that we don't want to scare, just have fun with the shapes!
See what splatter looks like for each of the following:

Or try Chromatography
 Step 1: cut paper towels into long strips
Step 2: Put a marker dot or line near the bottom of paper towel strip
Step 3: Tape the paper towel to the pencil
Step 4: Fill the container so the water will barely touch the paper towel
Step 5: Hang the paper towel into the conainer from the pencil
Step 6: Watch the paper towel absorb the water. As the water moves up the paper towel the color separates into the colors it was made from
step 7: let it sit until all the colors are separated (takes awhile, might want to have one done so the girls don't have to wait so long)
step 8 take paper towel out of container!


or try DNA extraction
do this with bananas or here are 10 other foods to try...


Requirment #2
Eyewitness Activity (requirement #2 and forensic artist career #5)
Eyewitness Activity (requirement #2 and forensic artist career #5)
Supplies:
·
Computer(s)
if using the “Art of Detection” game from the internet OR make your own with
a photo suspect, video suspect, or guest suspect to run through the room
a photo suspect, video suspect, or guest suspect to run through the room
·
Pencils; paper
3-5 minutes
discussion on forensic sketch artists, how learning to drawing certain shapes
and features is like learning a language, the more you draw the larger your
drawing vocabulary is. Most people don’t
pay attention to shapes and spacing of eyes, eyebrows, noses, and face
shapes. Most people do notice hair color
and skin color. Discuss why eyewitness
accounts are often very unreliable and why that might be (weather, stress,
health, personal bias). Explain what the
Innocence Project is and share a story about wrongful conviction.
10 minutes Try
drawing a suspect. Girls can even
describe someone they know to their partner and see how they do.
We had a footprint comparison for them to solve for this requirement.
Answer to "Art of Detection" computer activity:

Answer to "Art of Detection" computer activity:

Rotation #6
Forensic Document Examiner
3-5 minutes: Talk
about how handwriting always varies and no one writes the same way every
time. Talk about how a "cluster of
similarities" can be used to indicate a match between a known writing sample and
an unknown document. Talk about the main
points to
compare.
10 minutes: match a few up handwriting samples and
compare.
10 minutes: match a few up handwriting samples and
******************************Just For fun: Handwriting can give a peek into your personality. Make a writing sample and analyze it. Our girls LOVED this!
Slant of base line
Size of letters
Dots on i and
crosses on t.
Spacing
Neatness of
letters


Monday, January 11, 2016
Letter O preschool day
O is for Octopus!


Gathering Activity: Build with blocks or paint color circles (cardstock works best, but ordianary paper will do) I encouraged the children to make four different colors. Some of them wanted to paint 3 or 4 color circles. A few of my younger ones just built with duplos and had me paint for them. I'm not super picky as long as they have fun. (Boys especially often learn from blocks and Legos better than paint.) I used finger paint since thats what I had, but I'm sure washable tempera paint would be best. I had a pile of q-tips and paint brushes and textured items to stamp with, but what I liked best was painting the textures with a q-tip and then stamping. I was going for octopus camoflauge so I did orange swirls for coral, q-tip dots for bubbles, blue/green/purple for rocks, and I did a purple fish. The kids free paint was very cute, the ones I did were a bit boring. I didn't have any full circles left for the picture, sorry!

If a child's color circle doesn't have four, distinct backgrounds or if they want to use colors from more than one circle you can cut and paste/tape down onto the card stock and then outline it with a sharpie.
If the paint dries, these can be assembled at class, otherwise make holes for the fasteners and show the parents a sample and have them fasten at home. I put our paintings in the dehydrator for 20 minutes to speed drying times, but that is probably not something most people have on hand.
color circles

Letter Awareness:
We looked for the letter O on favorite food packages and ate some! Orange juice would have been good for this or cheerios and Froot Loops.

Literacy:

Little Owl's Night by Divya Srinivasan
before reading=Do you go to bed at night or in the morning? When do you think baby owls go to bed? What does an owl do for fun all night long? This is a funny kind of bedtime story because the owl goes to sleep in the morning!
Octopus Alone by Divya Srinivasan
before reading=does anyone ever bug you? do you ever want to be alone where it is quiet? Do you know someone who is shy? Are you shy? An octopus is shy, watch her hide in her cave and watch everyone else play!
while reading= when she is happy in her cave she is ________(orange)
how many seahorses come to tickle her?________(1,2,3)
When she leaves the cave what color does she turn?___________(blue)

When she is stripey can you find her?

Here she turns pink!

When she is scared of the eel what color does she turn?___________(white)
See how she changes shape when she swims fast.
After she sees the whale she looks bubbly, where are the bubbles?
She misses her friends, so she goes home, can you find them all? What fish is the prettiest? Do you see the shark?
Science:
Watch this 4min video of real octopuses playing hide n' seek. Gray plant, scared giant cloud, brown rock, green plant. Where's the Octopus? (I skip over the color cells part). There is a 1 min mimic octopus film that shows zebra stripes and the octopus being a poisonous fish too!
 Free Play and Take Home Craft:
I finish with free play while we assemble the take home craft.
brass fasteners ($3 walmart), tape, glue stick, doubled sided tape (if possible), sharpie marker (optional).
top layer: Print the octopus on transparency paper (similar price to color prints) or trace onto a page protector with sharpie and cut it out. Print the text pages on regular paper glue or double sided tape together.
 :
:
I attached the octopus text page on top of the transparency with double sided tape for speed, but glue or cleat tape on the edges could workk too. Put this on top of the color circle. Stab a hole in the middle with an exacto knife or something very sharp. Insert a brass fastener. If the color circle is still drying just put the holes in the transparency page and color circles. The pages can be fastened together later.
Wednesday, January 6, 2016
Winning Science Fair Projects
You really don't have to win, but if you have a meaningful project, what you learn will help you throughout your life! It isn't about the best experiment, it is about the best process and display.
A winning project
Bonus points for communication
The entire purpose of going to school is to learn how to communicate ideas, whether through numbers, writing, spelling, music, pictures, charts, graphs, or just body language. A huge part of the score at science fair is based on how well you and your display communicate what you did. I often see an overused topic and experiment still win because of great research and had a neat, organized display. Imagine if your display, research, and experiment were all amazing...
Great Display Tips
1-Projct display is very neat and organized
2-Take the time to choose great colors (consider painting the background a new color if it helps tell the story of your project better), fonts (maybe a theme font for your title would help), font sizes, and graphics (tell it with pictures if you can).
3-My kids aren't allowed any science fair props, just the display board. I tell them to make good use of pictures and iconic images to grab interest, entertain, and tell the story of their project.
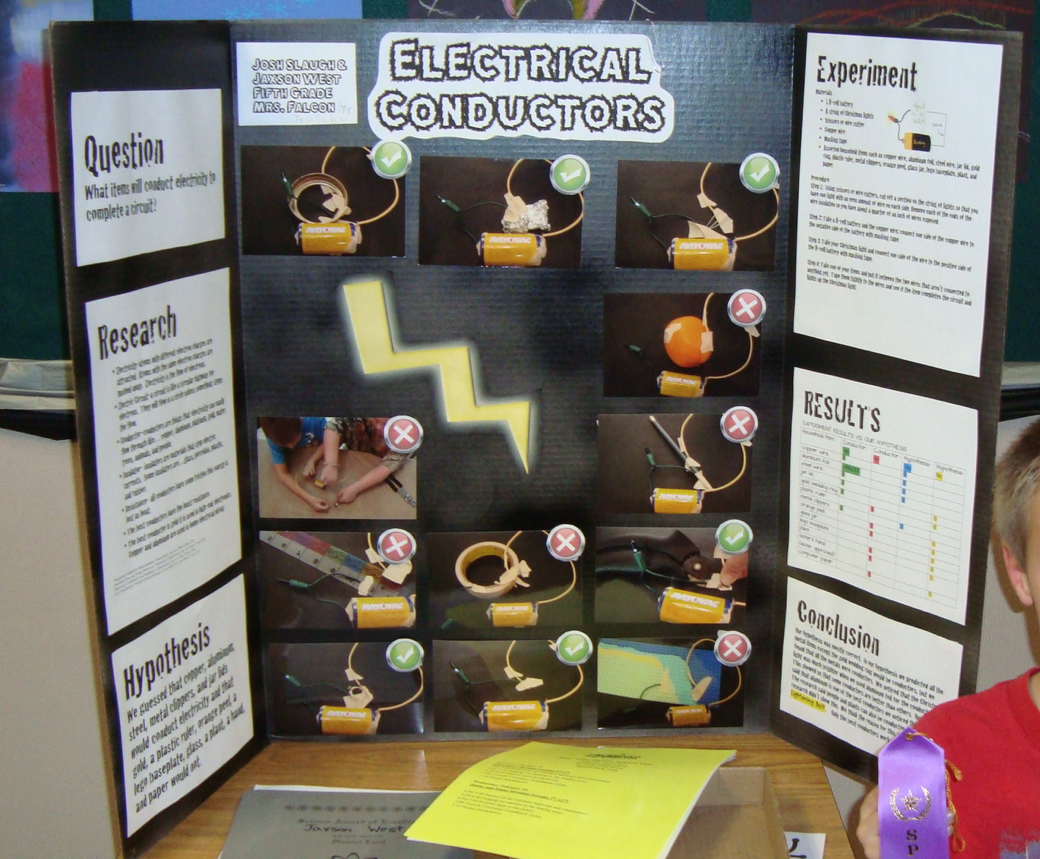
If they did electricity--a black board with a yellow bolt of lightening serves well, an experiment on learning modes of special needs children can have crayons or ABC blocks. If it was a project about dogs, paw prints around the edges are great. A project on fingerprinting had a giant fingerprint and magnifying glass in the middle. I encourage students to set aside a little time to put a neat, well thought attention grabber on their project display board. This tells the story from across the room and draws interest to the project.
4-The title should grab attention and tell about what you did. Avoid "Gravity" or "Magnets" or "Plants". It needs to tell more specifics. Often the question makes a good title. If the question is too long, think of something else that is interesting and summarizes the project well. It is the most remembered part of the display, make sure it has good contrast with your background color and that it isn't too small to read from a distance or too large for your board. 2 inch letters are about as small as you can go.
5- Put the most important information in the first sentence of every text box. That might be all judges read. For example your conclusion shouldn't wait until the last sentence to say whether your hypothesis was correct. The experiment text box should give you as much information in the first sentence as possible and then elaborate. For example: "We tested children's capability to memorize before and after large amounts of sugar... " rather than "First we took permission slips to 10 homes that had children between the ages of 3 and 8, then we set up several trial dates, then we made appointments...." Also, if you are able to use pictures with short labels that is sometimes an easier way to convey information.
6- Label your graphs in a way that someone unfamiliar with your project can quickly learn the information. A graph is required, but if the labels aren't very clear, no one will know what they are talking about and they will be ignored. My boys labeled one of their graphs on electric current "Intensity". I had them go back and relabel it "Intensity of the light when different sized magnets were placed next to the circuit" It was a long title, but with the new label, judges can see at a glance that putting a magnet next to an electric current reduces how brightly the lightbulb shines. They don't even have to read the conclusion, in an instant they can see the answer to the question (how do magnets affect...) as well as that the hypothesis was correct (they will cause the lightbulb to be dimmer). Now the judges have time to focus on how well researched the project was and to talk to the boys about how well they understand the topic they are presenting. They have time to be impressed instead of trying to make out what the project was all about.
Tips:
Text Contrast:
Do NOT break the following rule!
All text must have sufficient contrast! Light text on a dark background or dark on light. No dark text on medium or medium text on anything! Since printers are black you must rule out printing on almost all colors, but white and maybe light pastels. In order to have a two-tone color scheme on your display it is almost always best to have a background color. And then use colored borders on your pictures, charts, and text boxes. Most boards start out white, but for 1-2 dollars you can buy a can of spray paint and change the color. You can also use wrapping paper, butcher paper, or contact paper. This is the science of getting noticed and requires as much thought and time as the scientific research you do.
Storyboard to ensure neatness:
Plan your display. Sketch your board out to scale on paper. Plan how much room each picture, chart, or text box will take including the colored borders if you will be using those. This is important, because when you type, you will know how much space you have and how big to make the fonts or how big to print the pictures. It helps you avoid printing things out too big or too small. It helps you know when you need to cut and trim text.
If you will have a report with your display choose a cover that matches the board and is visually appealing. These little details set your project apart and get the judges attention instantly. They don't know why, they just like it better and can score you tie breaking points!
Example of using Icons:
below, the red "x" and green checks, lightening bolt.
Some winning projects from district:
this project very clearly shows all the steps of the scientific process and judges are looking for this. The conclusion textbox has the most important part highlighted, I liked that too. The title was a bit boring, so there is always room for improvement.

I liked the clothesline icon with the fabric shrinking project, creative for sure!

Paw print icons for the pet handed-ness project, memorable.

Sugar bag colored project board with great 3-D graph. There was a picture of the drink with a ziplock of how much sugar each contained in front of it. I always like pictures better than words if they will convey the message!

The title is repeated in picture form with a brain lifting weights, I love it!

Title makes me curious, the video game controller under the title is a great attention grabber.

The comical cocoa cups took this title "Hot or Not" from boring to interesting.

The whole project is easy to understand in a brief glance, I noticed this one from a distance.

Great icons for "emotions", nice color scheme!

I see this science project done every year and it is always an attention getting project. This is an example of winning despite not having a terribly difficult or creative project.

A winning project
- The display should be neat, creative, and easy to understand! (In our state students get 30 pts for appearance of display. They get 30 points for the skill involved in the project, so the appearance and work are equally important. You should spend as much time on the board as you do on the experiment.)
- Have great background research. Cite or even include more than one background research article, interview, or book. Cite them correctly using a bibliography app. Summarize the most important facts you learned from the background research and put them in your project write-up under Background Research. Use these points to form your question and hypothesis. Many students just do a science experiement. They miss out on research, question, and hypothesis and add those at the end. Research if very often completely missed. (In our state students get 10 pts for this if they have research and the dates that it was done in their project write-up, this can be a tie-breaker.)
- Have a strong hypothesis. It is much stronger if you explain "why". (You might base it on your research, or similar research studies that have been done.)
- Write down observations during the experiment. This is called "Data".
- Find the best way to illustrate this data graphically. this is "Results". Not all students are sure what the difference is between "data" and "results". (If the graph is labeled clearly and is easy to understand the students get an extra 10pts. Don't just put a graph on your board, make sure ANYONE looking at it will understand what it means.)
- The conclusion should clearly state whether your hypothesis was supported by your results, mention surprising findings if there were any, and mention anything that you think would be interesting to study further.
- Be creative in your topic/experiment. I put this last because the other things can compensate for having a typical project, but not vice versa. (creativity 10 points)
- At the district and regional level our students get an additional 10 points for clearly describing their project to judges, 10 points for understanding their subject matter well in the interview, and another tie breaker is 10 points for being the overall best project in comparison to others.
Bonus points for communication
The entire purpose of going to school is to learn how to communicate ideas, whether through numbers, writing, spelling, music, pictures, charts, graphs, or just body language. A huge part of the score at science fair is based on how well you and your display communicate what you did. I often see an overused topic and experiment still win because of great research and had a neat, organized display. Imagine if your display, research, and experiment were all amazing...
Great Display Tips
1-Projct display is very neat and organized
2-Take the time to choose great colors (consider painting the background a new color if it helps tell the story of your project better), fonts (maybe a theme font for your title would help), font sizes, and graphics (tell it with pictures if you can).
3-My kids aren't allowed any science fair props, just the display board. I tell them to make good use of pictures and iconic images to grab interest, entertain, and tell the story of their project.
If they did electricity--a black board with a yellow bolt of lightening serves well, an experiment on learning modes of special needs children can have crayons or ABC blocks. If it was a project about dogs, paw prints around the edges are great. A project on fingerprinting had a giant fingerprint and magnifying glass in the middle. I encourage students to set aside a little time to put a neat, well thought attention grabber on their project display board. This tells the story from across the room and draws interest to the project.
4-The title should grab attention and tell about what you did. Avoid "Gravity" or "Magnets" or "Plants". It needs to tell more specifics. Often the question makes a good title. If the question is too long, think of something else that is interesting and summarizes the project well. It is the most remembered part of the display, make sure it has good contrast with your background color and that it isn't too small to read from a distance or too large for your board. 2 inch letters are about as small as you can go.
5- Put the most important information in the first sentence of every text box. That might be all judges read. For example your conclusion shouldn't wait until the last sentence to say whether your hypothesis was correct. The experiment text box should give you as much information in the first sentence as possible and then elaborate. For example: "We tested children's capability to memorize before and after large amounts of sugar... " rather than "First we took permission slips to 10 homes that had children between the ages of 3 and 8, then we set up several trial dates, then we made appointments...." Also, if you are able to use pictures with short labels that is sometimes an easier way to convey information.
6- Label your graphs in a way that someone unfamiliar with your project can quickly learn the information. A graph is required, but if the labels aren't very clear, no one will know what they are talking about and they will be ignored. My boys labeled one of their graphs on electric current "Intensity". I had them go back and relabel it "Intensity of the light when different sized magnets were placed next to the circuit" It was a long title, but with the new label, judges can see at a glance that putting a magnet next to an electric current reduces how brightly the lightbulb shines. They don't even have to read the conclusion, in an instant they can see the answer to the question (how do magnets affect...) as well as that the hypothesis was correct (they will cause the lightbulb to be dimmer). Now the judges have time to focus on how well researched the project was and to talk to the boys about how well they understand the topic they are presenting. They have time to be impressed instead of trying to make out what the project was all about.
Tips:
Text Contrast:
Do NOT break the following rule!
All text must have sufficient contrast! Light text on a dark background or dark on light. No dark text on medium or medium text on anything! Since printers are black you must rule out printing on almost all colors, but white and maybe light pastels. In order to have a two-tone color scheme on your display it is almost always best to have a background color. And then use colored borders on your pictures, charts, and text boxes. Most boards start out white, but for 1-2 dollars you can buy a can of spray paint and change the color. You can also use wrapping paper, butcher paper, or contact paper. This is the science of getting noticed and requires as much thought and time as the scientific research you do.
Storyboard to ensure neatness:
Plan your display. Sketch your board out to scale on paper. Plan how much room each picture, chart, or text box will take including the colored borders if you will be using those. This is important, because when you type, you will know how much space you have and how big to make the fonts or how big to print the pictures. It helps you avoid printing things out too big or too small. It helps you know when you need to cut and trim text.
If you will have a report with your display choose a cover that matches the board and is visually appealing. These little details set your project apart and get the judges attention instantly. They don't know why, they just like it better and can score you tie breaking points!
Example of using Icons:
below, the red "x" and green checks, lightening bolt.
Some winning projects from district:
this project very clearly shows all the steps of the scientific process and judges are looking for this. The conclusion textbox has the most important part highlighted, I liked that too. The title was a bit boring, so there is always room for improvement.
I liked the clothesline icon with the fabric shrinking project, creative for sure!

Paw print icons for the pet handed-ness project, memorable.

Sugar bag colored project board with great 3-D graph. There was a picture of the drink with a ziplock of how much sugar each contained in front of it. I always like pictures better than words if they will convey the message!

The title is repeated in picture form with a brain lifting weights, I love it!

Title makes me curious, the video game controller under the title is a great attention grabber.


The comical cocoa cups took this title "Hot or Not" from boring to interesting.

The whole project is easy to understand in a brief glance, I noticed this one from a distance.

Great icons for "emotions", nice color scheme!

I see this science project done every year and it is always an attention getting project. This is an example of winning despite not having a terribly difficult or creative project.

Saturday, November 14, 2015
What's Your Story? PTA Reflections Ideas
For each entry judge two things:
1) Is the concept the student described in the artist statement
related to the theme?
2) Is the concept they described in the artist statement
conveyed in the art?
They must have a better than great concept AND communicate it in a crystal
clear way to get the top scores! Bonus:at the end see a fun example of how to communicate "What's your story?" with art.
Read on to see what Beginning, Developing, Proficent,
Accomplished, and Advanced Entries look like as well as how to judge the tricky
ones.
This is the judging rubric for Interpretation of Theme and it is half the score for each entry. The rest of the score is on creativity and quality. However, this is where the big points are earned!

pretend the theme
this year was
"YUMMY!"
#1 Artist Statement: "trees inspire me"

Is the concept the student described in the artist statement
related to the theme? No (therefore the max score is 4 points)
Is the concept they described in the artist statement clearly
communicated in the art?
yes! (they get their 4 points)
Score 4 pts
#2 Artist Statement: "I love the state fair,
everything there looks yummy"

Is the concept they described in the artist statement clearly
communicated in the art?
no, is the artist saying the ferris wheel is yummy looking and
the funnel cake stand is yummy? I think
they actually mean the food at the fair is the yummiest food they know of, but this
isn’t a picture of lots of yummy food, it is mainly an eye-catching ferris
wheel picture. (The maximum score for only partially conveying the theme is 8
pts, since the artist statement was perfectly related to the theme and pretty
original I gave the full points allowed for a project that only partially
communicates the concept.)
Score 8 pts
#3 Artist Statement:"I think donuts are yummy."

Is the concept the student described in the artist statement
related to the theme? yes!
Is the concept they described in the artist statement clearly
communicated in the art?
yes! Hooray! (Now I
know their score will be 9-20pts so I ask one more question.
Is this concept basic, thoughtful, or very deep and full of
meaning? Basic (the maximum points for a basic concept is 12 pts, you might
give anywhere from 9-12 points based on your evaluation)
Score 12 pts
#4 The Tricky to Judge
Project!
What if it is an
amazing project and the artist statement has been made to fit the theme very
well, but if you are honest, it doesn’t look like they were trying to
communicate the theme in their art?
This happens all the time.
There are always high quality entries that judges want to give top marks
to. They have an artist statement that
relates to the theme nicely, but the actual project doesn’t look or feel at all
like it was made with the theme in mind.
I reward the student with full credit for their creative artist
statement (10 points), but I do not give credit if the project doesn’t convey the
theme (0 points for communicating the theme).
The resulting score is a 10, conveniently the middle possible score and it is probably the score I have given
the most times in the interpretation of theme category. Don’t worry judges, this student might still
win first place because of their high marks in the other categories, but the
artist’s primary job is to reflect on the theme and then show it in their art
and if someone does that really well, sometimes they win even if their art
isn’t as fancy.
#5 Artist Statement: "I think lots of different
things are yummy."

Concept related to theme and well thought out: YES! This student has put all their personal favorite yummy stuff. The difference between this and the previous one is that the first took almost no thought to come up with and this one took some real time and "reflection"!
Concept clearly communicated: Yes, I don't even need the artist statement, the concept comes through perfectly, I love the smiley face!!!
Score 16pts.
Artist Statement: "Yummy really depends on your point of view. Are you a fish or a cat?"


Concept well thought out, full of "meaning purpose and integrity": I still don't know what that means, but I tell kids and judges to look for emotional response, human connections, deep thought, art that motivates you to change or think differently, anything that really sets it apart. This student really "reflected" on the theme in a deep way and it is obvious.
Concept clearly communicated: Yes, it is very clever. Wow! Score 20pts.
Example #2 using 2016-2017 Refelections Theme is
"What's
Your Story?"
"trees inspire me"
Concept related to theme=no, a story could be what defines you,
it usually has a begining middle and end or at very least a start and end.
A story could also be a journey, a transformation, a change of direction,
an epiphany. This art could be a story, but the artist statement doesn't
really show it.
Does the art clearly communicate "trees inspiring me"?
Yes (kind of), I am inspired when I look at it. However if I am
honest it doesn't really show trees inspiring the artist. I'm generous
because this is already quite a low score, but if I'm teaching a student how to
do a reflection, I would encourage them to show how the tree is affecting them,
rather than just a really great tree.
4 pts
"I love the state fair"
Concept related to theme=yes, it tells what the artist loves and
that is definitely their story.
Does the art clearly show the artist loves the state fair=yes
and no, it shows the state fair has great color and that we are going to love
it, but I don’t know the artist loves the fair just by looking at the
picture. That is the challenge of
reflections, show what you think with your art, but this doesn’t do that.
score: A simple concept, not clearly communicated: 8 points
for interpretation of theme
"My story is that I am like these donuts, my life looks
wonderful on the outside, but once you get underneath the surface it is really
pretty much the same every day."
Concept related to the theme and well though out: yes, it is
pretty personal to say that your life looks really cool at first glance, but is
rather ordinary in reality. This is also a bit more complex concept than
the other projects had which shows great reflecting.
Concept clearly communicated by the art: No, I don't see the
story from the artist statement portrayed in the art. Some students might put a catchy phrase on the
photo with the donut such as "life is a pink frosted donut with
sprinkles". That would help. Perhaps they would show a girl in
a pink sparkly dress eating a donut, so you can see that she is like a donut.
This is a great reflection, but a difficult concept to convey and I don't
think they pulled it off.
Summary, great concept, but not really communicated by the art.
This is the most common score I see. 10pts for interpretation
of theme.
"I think my story is best told through my favorite foods.
Food is a big part of life and people have lots of food emotions and no
two people love exactly the same foods."
Concept related to theme: yes, very well thought out! I
would score it higher than just a simple, similar concept like my favorite food
is Jelly Belly Beans.
Concept clearly communicated in art: absolutely!
score:16 pts
For this theme, I'm expecting things such as some sort of unique
moment that changed them to be portrayed, the thing that makes them unique,
something close to their heart, something that illustrates their mission or
purpose in life, a tribute to their roots, or their personal trials or
dilemmas.
Perhaps collage or a picture that shows movement, or a snapshot
depicting that crucial moment in time, or perhaps they find a way to portray
their story with a picture that clearly illustrates what is going to happen
next.
"My Life in 23 years painted on my own nails on my 23rd
birthday"

I know this isn't a student's project, but it fit really well,
so I'm showing it.
Concept full of meaning, purpose, and integrity? Yes! Integrity:
this is her, no excuses, not what she thinks other people want her to be.
Its honest and entertaining!
Clearly Communicated? Amazingly well! I think Jessie Mills has
a fun concept full of meaning, integrity, and purpose and that it is clearly
communicated. She put all 23 years of her life in mini pictures on her
own nails! Check out her blog post where she describes every single
year here!
Note: I don't own any of these pictures, they are from internet
searches (except the cat/fish picture which I photoshopped), I just share
them for educational purposes. Thanks.
Subscribe to:
Posts (Atom)