You really don't have to win, but if you have a meaningful project, what you learn will help you throughout your life! It isn't about the best experiment, it is about the best process and display.
A winning project
- The display should be neat, creative, and easy to understand! (In our state students get 30 pts for appearance of display. They get 30 points for the skill involved in the project, so the appearance and work are equally important. You should spend as much time on the board as you do on the experiment.)
- Have great background research. Cite or even include more than one background research article, interview, or book. Cite them correctly using a bibliography app. Summarize the most important facts you learned from the background research and put them in your project write-up under Background Research. Use these points to form your question and hypothesis. Many students just do a science experiement. They miss out on research, question, and hypothesis and add those at the end. Research if very often completely missed. (In our state students get 10 pts for this if they have research and the dates that it was done in their project write-up, this can be a tie-breaker.)
- Have a strong hypothesis. It is much stronger if you explain "why". (You might base it on your research, or similar research studies that have been done.)
- Write down observations during the experiment. This is called "Data".
- Find the best way to illustrate this data graphically. this is "Results". Not all students are sure what the difference is between "data" and "results". (If the graph is labeled clearly and is easy to understand the students get an extra 10pts. Don't just put a graph on your board, make sure ANYONE looking at it will understand what it means.)
- The conclusion should clearly state whether your hypothesis was supported by your results, mention surprising findings if there were any, and mention anything that you think would be interesting to study further.
- Be creative in your topic/experiment. I put this last because the other things can compensate for having a typical project, but not vice versa. (creativity 10 points)
- At the district and regional level our students get an additional 10 points for clearly describing their project to judges, 10 points for understanding their subject matter well in the interview, and another tie breaker is 10 points for being the overall best project in comparison to others.
Note: the excellence of your actual experiment and how creative it was is 40pts, communicating it well through journal, display, and graphs is 50 pts!
Bonus points for communication
The entire purpose of going to school is to learn how to communicate ideas, whether through numbers, writing, spelling, music, pictures, charts, graphs, or just body language. A huge part of the score at science fair is based on how well you and your display communicate what you did. I often see an overused topic and experiment still win because of great research and had a neat, organized display. Imagine if your display, research, and experiment were all amazing...
Great Display Tips
1-Projct display is very neat and organized
2-Take the time to choose
great colors (consider painting the background a new color if it helps tell the story of your project better), fonts (maybe a theme font for your title would help), font sizes, and graphics (tell it with pictures if you can).
3-My kids aren't allowed any science fair props, just the display board. I tell them to make good use of pictures and iconic
images to grab interest, entertain, and
tell the story of their project.
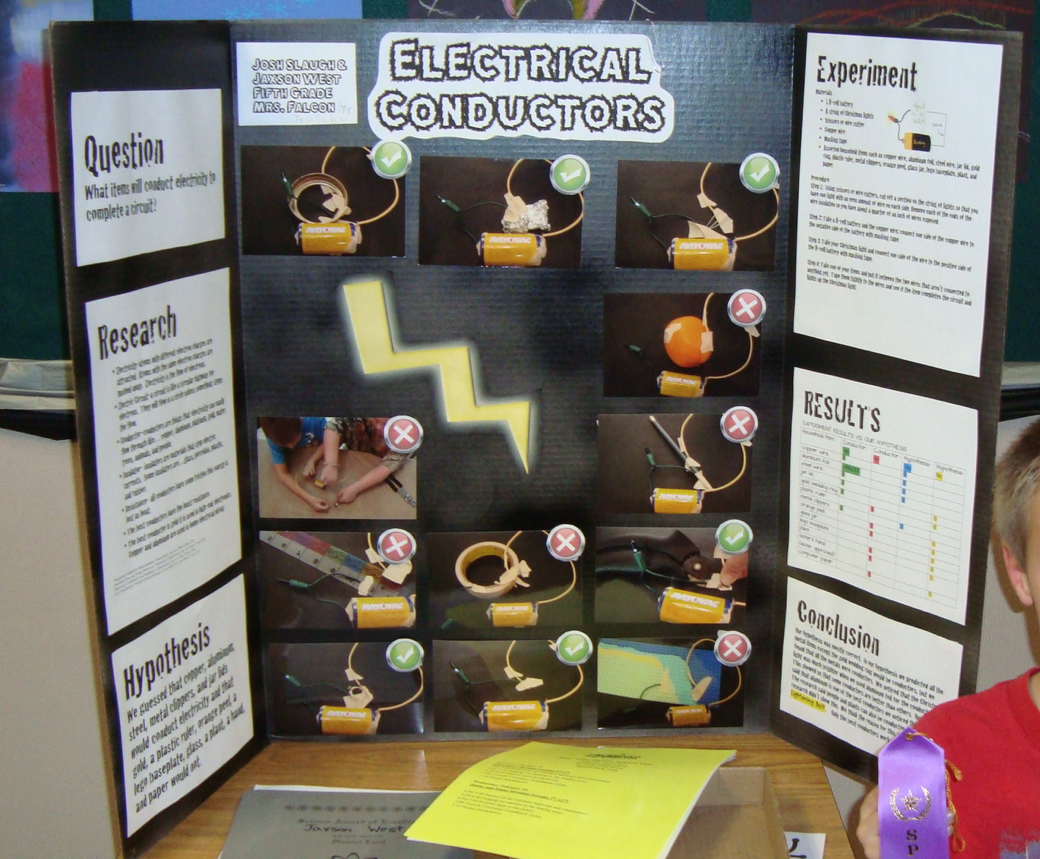
If they did electricity--a black board with a yellow bolt of lightening serves well, an experiment on learning modes of special needs children can have crayons or ABC blocks. If it was a project about dogs, paw prints around the edges are great. A project on fingerprinting had a giant fingerprint and magnifying glass in the middle. I encourage students to set aside a little time to put a neat, well thought attention grabber on their project display board. This tells the story from across the room and draws interest to the project.
4-The
title should grab attention and tell about what you did. Avoid "Gravity" or "Magnets" or "Plants". It needs to tell more specifics. Often the question makes a good title. If the question is too long, think of something else that is interesting and summarizes the project well. It is the most remembered part of the display, make sure it has good contrast with your background color and that it isn't too small to read from a distance or too large for your board. 2 inch letters are about as small as you can go.
5- Put the
most important information in the first sentence of every text box. That might be all judges read. For example your conclusion shouldn't wait until the last sentence to say whether your hypothesis was correct. The experiment text box should give you as much information in the first sentence as possible and then elaborate. For example: "We tested children's capability to memorize before and after large amounts of sugar... " rather than "First we took permission slips to 10 homes that had children between the ages of 3 and 8, then we set up several trial dates, then we made appointments...." Also, if you are able to use pictures with short labels that is sometimes an easier way to convey information.
6-
Label your graphs in a way that someone unfamiliar with your project can quickly learn the information. A graph is required, but if the labels aren't very clear, no one will know what they are talking about and they will be ignored. My boys labeled one of their graphs on electric current "Intensity". I had them go back and relabel it "Intensity of the light when different sized magnets were placed next to the circuit" It was a long title, but with the new label, judges can see at a glance that putting a magnet next to an electric current reduces how brightly the lightbulb shines. They don't even have to read the conclusion, in an instant they can see the answer to the question (how do magnets affect...) as well as that the hypothesis was correct (they will cause the lightbulb to be dimmer). Now the judges have time to focus on how well researched the project was and to talk to the boys about how well they understand the topic they are presenting. They have time to be impressed instead of trying to make out what the project was all about.
Tips:
Text Contrast:
Do NOT break the following rule!
All text must have sufficient contrast! Light text on a dark background or dark on light. No dark text on medium or medium text on anything! Since printers are black you must rule out printing on almost all colors, but white and maybe light pastels. In order to have a two-tone color scheme on your display it is almost always best to have a background color. And then use colored borders on your pictures, charts, and text boxes. Most boards start out white, but for 1-2 dollars you can buy a can of spray paint and change the color. You can also use wrapping paper, butcher paper, or contact paper. This is the science of getting noticed and requires as much thought and time as the scientific research you do.
Storyboard to ensure neatness:
Plan your display. Sketch your board out to scale on paper. Plan how much room each picture, chart, or text box will take including the colored borders if you will be using those. This is important, because when you type, you will know how much space you have and how big to make the fonts or how big to print the pictures. It helps you avoid printing things out too big or too small. It helps you know when you need to cut and trim text.
If you will have a report with your display choose a cover that matches the board and is visually appealing. These little details set your project apart and get the judges attention instantly. They don't know why, they just like it better and can score you tie breaking points!
Example of using Icons:
below, the red "x" and green checks, lightening bolt.
Some winning projects from district:
this project very clearly shows all the steps of the scientific process and judges are looking for this. The conclusion textbox has the most important part highlighted, I liked that too. The title was a bit boring, so there is always room for improvement.

I liked the clothesline icon with the fabric shrinking project, creative for sure!

Paw print icons for the pet handed-ness project, memorable.

Sugar bag colored project board with great 3-D graph. There was a picture of the drink with a ziplock of how much sugar each contained in front of it. I always like pictures better than words if they will convey the message!

The title is repeated in picture form with a brain lifting weights, I love it!

Title makes me curious, the video game controller under the title is a great attention grabber.

The comical cocoa cups took this title "Hot or Not" from boring to interesting.

The whole project is easy to understand in a brief glance, I noticed this one from a distance.

Great icons for "emotions", nice color scheme!

I see this science project done every year and it is always an attention getting project. This is an example of winning despite not having a terribly difficult or creative project.


 Free Play and Take Home Craft:


